RSS
Showing posts with label ideas for kids. Show all posts

Bunny Ears


Turn your little one into an Easter bunny with a pair of pink felt ears.

Tools and Materials
Child-size headband
8-by-16-inch piece of pink felt
6-by-6-inch piece of white felt scissors
pinking or scalloped shears (optional)
hot-glue gun
hot-glue sticks

To Cover the Headband
1. Measure the width and length of the top of the headband, add 1/2 inch to all sides, and cut a strip of pink felt to cover.

2. Glue the felt strip onto the top of the headband, wrapping the extra material around the headband's edges.

3. Measure the underside of the headband, and cut a strip of pink felt to fit.

4. Glue the strip to the underside, creating a backing that covers the edges of the top felt.

To Make the Ears
1. Print out our bunny-ears template, and cut out both shapes.

2. Trace the outer-ear shape onto pink felt twice, and cut along scalloped edge (or cut out with pinking or scalloped shears).

3. Trace the inner-ear shape onto white felt twice, and cut out with regular scissors.

4. Glue each pair of ears together with hot glue, and let dry.

5. Crease each ear vertically down the middle, and press.

6. Fold up the bottom flaps on either side of the notch, and attach to headband with hot glue, pulling notches closed so ears are slightly bent. Hold until glue sets.

Printable Valentines


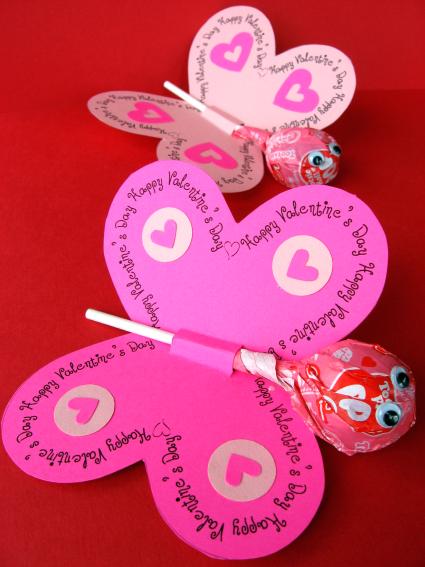
Here is a free printable Valentine if you need something quick and easy. I am going to have my little girl make these for her class———-I am sure the next ones will have a generous helping of glitter for embellishment!

Download Butterfly Valentine ,print on colored card-stock, cut out, make slits for sucker, add some decorations (cut out shapes of paper, stickers, glitter, etc.), insert sucker and then add some wiggly eyes to the top of the sucker. Add a piece of tape to the back to keep the sucker securely in place.

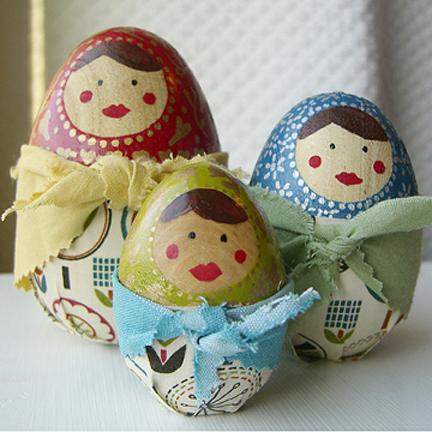
Egg Matryoshka Dolls | Kids Crafts


Supplies:

  • 3 wooden eggs of varying sizes (available at craft stores)
  • painter’s tape
  • exact-o knife
  • acrylic paint
  • small paint brushes
  • paint pen (s)
  • spray polyurethane (I used clear satin for a little shine)
  • fabric scraps
  • scissors
  • spray adhesive (multi-purpose craft adhesive)

Note: Before you begin, you might want to lightly sand the eggs. I did not sand mine and wish I had. The bumpy surface makes painting a little more difficult and the porous areas allow paint to seep under the painter’s tape when you are painting the upper portion.

Step 1: Cut a circle from the painter’s tape. I rolled out some tape onto my cutting mat, traced a circle and used an exact-o knife to cut it out. I then applied it to the egg where I wanted the face. Make sure that the tape is pressed down firmly all around the edges. Measure where you want the paint to stop and mark that with a pencil. Paint this area and allow to dry for about five minutes. Then remove the painter’s tape circle and touch up any areas where paint may have bled through.

supplies.jpg

Step 2: Paint the face. I used a small brush and undiluted acrylic paints.

Step 3: Use paint pens and/or paint to embellish the top portion. Spray with a coat of polyurethane and allow to dry.

Step 4: Wrap fabric around the eggs to measure how much you will need for each bottom portion. Mark and cut. Then cut slits about 1″ long at 1″ intervals in the bottom of the fabric. Spray back of fabric with spray adhesive and apply to the egg carefully and quickly. On the bottom press down every other tab, then come back around and press down the rest. This will allow for a pleated look at the base (see image below). You may have to spray a bit more adhesive as you are working.

doll-bottom.jpg

Step 5: Make scarves. Again wrap fabric around the egg and add a couple of inches extra. Cut a long, narrow triangle of fabric. You could finish the top, but I just folded mine under and used the selvedge ends. I used pinking shears for the edges.


Goldfish | Kids Crafts


Things are going swimmingly for this giggly goldfish. His quilted costume, which ends in a generous tail and is worn with an orange snap-bottom T-shirt and leggings, is perfect for a child who is mesmerized by ponds and fish tanks. The enclosed bottom makes it only suitable for babies who aren't yet walking.

Tools and Materials

60-inch-long piece of Craft paper
1 1/2 yards of orange wool felt
1 yard of 1/4-inch-thick polyurethane foam or one bag of wool-blanket batting
4 sets of Velcro fastener dots, 1/2 yard of pink wool felt
Scraps of black and white felt
White craft glue.

Goldfish How-To


1. To make patterns, draw a grid of 2-inch squares on craft paper; copy templates by hand onto it. Using fish pattern, cut one piece of orange felt and foam with front scoop neckline and one piece orange felt and foam with back neckline. Use orange part of pattern to cut one front and one back from orange felt for lining. For the front, layer foam, then whole felt, then half felt; stitch around top from notch A to notch B, with 1/4-inch seam allowance. Turn right side out so foam is between felt pieces. Quilt front from top to bottom, making rows of 4 1/2-inch scallops 2 1/2 inches apart. Repeat with remaining pieces for back. Place front and back together, right sides facing. Sew around tail from notch A to notch B, with a 1/4-inch seam allowance. Turn right side out. Sew Velcro fastener dots at shoulders and underarms, as shown on template.


2. Use hat pattern to cut two pieces of felt, one orange and one pink, and one piece of foam. Layer pieces: foam, pink felt, and orange felt. Sew top, bottom, and one side closed with 1/4-inch seam allowance. Turn right side out. Quilt as above. Fold in half, pink side out; sew along short edge. Turn orange side out. Cut eye from black and white felt scraps. Glue on as shown.

Spring Chicken | Kids Crafts


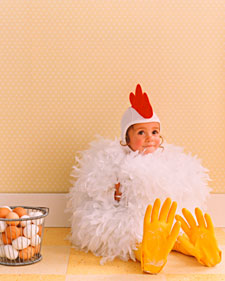
Why did this baby chicken cross the road? To get to the Halloween party, of course. Her costume is made from two tickly feather boas, ordinary kitchen gloves, yellow tights, and a pilot's cap that's crowned with a felt comb. Under the plumage, two leotards are stuffed with batting for extra plumpness. Appropriate for children ages 3 and older.

Tools and Materials

2 white long-sleeved leotards
One bag of loose wool batting
2 heavyweight white feather boas
Safety pins
Two 8-by-10-inch pieces of red wool felt
White pilot's cap
Hot-glue gun
Yellow rubber gloves
Sneakers with a heel tab

Chicken How-To

1. For the bodysuit, place one leotard inside the other; stuff batting between them, and sew together at necklines and leg holes. With your child wearing the bodysuit, drape boas across and around the body; safety-pin in place. Remove costume from child, and handstitch in place every 4 inches.


2. For the hat, use the comb template to cut two pieces of felt. Stitch combs together with a 1/4-inch seam allowance, leaving the bottom open. Turn right side out; stuff peaks with batting. Stretch hat over a ball or other round object; attach comb using the hot-glue gun on a low setting.


3. For the feet, stuff fingers of gloves with batting. Slip sneaker into glove, palm side down. Pull glove taut so fingers arch up (to prevent tripping); cut slit in center of glove from tongue of shoe to heel tab. Pull end of slit beneath heel. Snip extra cuff, leaving 2 inches; cut a notch at each corner. Fold sides in; secure with hot glue. Fold bottom up and top down; glue.

Boo Balloons | Kids Crafts


Isn't it funny how ghosts rear their heads at this time of year? They seem almost charming at first, but when darkness falls, those innocent expressions are a bit more menacing.

To make a floating ghost, snap one or two green eight-hour light sticks so they glow, and insert them into a white balloon; inflate balloon, and tie closed. Use a black marker to draw the ghost's ghastly visage. Repeat to make his friends. Then hang ghosts with transparent tape, and lower the lights.

Pocket Scarf | Kids Crafts


A muffler with sewn-up compartments offers all kinds of possibilities. Objects can be stockpiled, cleverly hidden, or simply toted along, like the dog on the left, for a very warm ride.

This is an easy project that older kids can do with adult supervision; all that's needed is pins, yarn, and a needle. Work with a scarf that's long and wide enough to accommodate the size pockets that kids would like.

Pocket-Scarf How-To
Kids should decide whether they want two pockets or three, and if they want them to be equal widths or not. Fold one end of the scarf up to the desired depth.

Pin the sides, and then pin the middle to correspond to the desired widths; you can use a ruler to make sure the pins are in a straight row, or follow the rib of the scarf itself.

Make a running stitch with a darning needle and yarn through both layers, using the pins as a guide. Reinforce top of seam with a cross stitch or a double stitch and tie off, hiding the ends inside.

Fun Stick Puppets | Kids Craft


Supplies and Tools
* Bucket of sticky-back craft foam shapes
* Colored craft sticks
* Tacky glue
* Scissors

Directions
1. Carefully cut away paper on back of foam shapes only where craft stick will be placed. Note: Adult supervision may be needed to cut paper from back of sticker.

2. Glue craft stick to foam shape.

3. If desired, two sticks can be glued together for a longer puppet handle.

Skill Level: No experience necessary

Approximate Crafting Time: 30 minutes