
Happy Birthday, Baby!
Celebrate with photos of your baby -- everywhere! Print a headshot onto circular labels to add character to cups, napkins, and goody bags.

Celebrate with photos of your baby -- everywhere! Print a headshot onto circular labels to add character to cups, napkins, and goody bags.

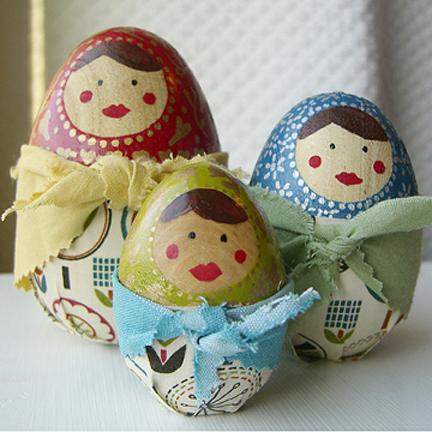
Supplies:
Note: Before you begin, you might want to lightly sand the eggs. I did not sand mine and wish I had. The bumpy surface makes painting a little more difficult and the porous areas allow paint to seep under the painter’s tape when you are painting the upper portion.
Step 1: Cut a circle from the painter’s tape. I rolled out some tape onto my cutting mat, traced a circle and used an exact-o knife to cut it out. I then applied it to the egg where I wanted the face. Make sure that the tape is pressed down firmly all around the edges. Measure where you want the paint to stop and mark that with a pencil. Paint this area and allow to dry for about five minutes. Then remove the painter’s tape circle and touch up any areas where paint may have bled through.
Step 2: Paint the face. I used a small brush and undiluted acrylic paints.
Step 3: Use paint pens and/or paint to embellish the top portion. Spray with a coat of polyurethane and allow to dry.
Step 4: Wrap fabric around the eggs to measure how much you will need for each bottom portion. Mark and cut. Then cut slits about 1″ long at 1″ intervals in the bottom of the fabric. Spray back of fabric with spray adhesive and apply to the egg carefully and quickly. On the bottom press down every other tab, then come back around and press down the rest. This will allow for a pleated look at the base (see image below). You may have to spray a bit more adhesive as you are working.
Step 5: Make scarves. Again wrap fabric around the egg and add a couple of inches extra. Cut a long, narrow triangle of fabric. You could finish the top, but I just folded mine under and used the selvedge ends. I used pinking shears for the edges.

Isn't it funny how ghosts rear their heads at this time of year? They seem almost charming at first, but when darkness falls, those innocent expressions are a bit more menacing.
To make a floating ghost, snap one or two green eight-hour light sticks so they glow, and insert them into a white balloon; inflate balloon, and tie closed. Use a black marker to draw the ghost's ghastly visage. Repeat to make his friends. Then hang ghosts with transparent tape, and lower the lights.

A muffler with sewn-up compartments offers all kinds of possibilities. Objects can be stockpiled, cleverly hidden, or simply toted along, like the dog on the left, for a very warm ride.
This is an easy project that older kids can do with adult supervision; all that's needed is pins, yarn, and a needle. Work with a scarf that's long and wide enough to accommodate the size pockets that kids would like.
Pocket-Scarf How-To
Kids should decide whether they want two pockets or three, and if they want them to be equal widths or not. Fold one end of the scarf up to the desired depth.
Pin the sides, and then pin the middle to correspond to the desired widths; you can use a ruler to make sure the pins are in a straight row, or follow the rib of the scarf itself.
Make a running stitch with a darning needle and yarn through both layers, using the pins as a guide. Reinforce top of seam with a cross stitch or a double stitch and tie off, hiding the ends inside.

Directions
1. Carefully cut away paper on back of foam shapes only where craft stick will be placed. Note: Adult supervision may be needed to cut paper from back of sticker.
2. Glue craft stick to foam shape.
3. If desired, two sticks can be glued together for a longer puppet handle.
Skill Level: No experience necessary
Approximate Crafting Time: 30 minutes


