RSS
Showing posts with label holiday. Show all posts

Egg Cup Ships


What you'll need:

  • 3 cardboard egg cups
  • Brown acrylic craft paint
  • Paintbrush
  • ¼ cup modeling clay or play dough
  • 6 toothpicks
  • 1 sheet white paper
  • Scissors
  • White craft glue

How to make it:

  1. Paint the egg cups inside and out with brown paint. Set aside to dry.
  2. Cut sails from white paper. You will need 6 large sails (1.5” x 1”) and 18 small sails (.5” x .75”).
  3. Set aside three of the toothpicks for the large sails. Break or cut the other three toothpicks in half, giving you 6 halves.
  4. Put a line of glue through the middle of one of the small sails. Place the cut or broken end of one of the toothpick halves onto the glue line.
  5. Roll it in the glue to cover both sides, then place another sail on top, sandwiching the two sails together. Flatten the sails together with your fingers and set aside to dry.
  6. Repeat step number 5 with each toothpick half and 2 small sails (each).
  7. Following the guide in step number 5, make the larger salls. For each large sail you will need a toothpick, 2 small sails and 2 large sails. Glue the small sail to the end of the full toothpick, and then glue the larger sail beneath it, leaving a small gap between the top and bottom sail. Set aside to dry.
  8. Roll a small amount of clay in your palm, enough to line the bottom of the egg cup. Place in the egg cup and flatten to cover bottom.
  9. Insert open end of large sail into the middle of the clay. Insert two small sails, one on either side of the large sail, into the clay.

Tips:

  • This project can also be made with open walnut shells.
  • The Nina and the Pinta were both smaller ships, but the Santa Maria was much larger. Make a larger version of the Santa Maria by using margarine tubs, craft sticks and larger pieces of paper.
  • Teachers, use this project to discuss Columbus’s voyages to the Americas.

7 Grocery Getups | Crafts Kids


Going to the supermarket takes on a whole new meaning when the goal is to look for ingredients for costumes. Who knew you could use ordinary household supplies to create Halloween haute couture? Add some craft supplies, and construct the costumes in most cases with just staples, packing tape, and glue. They're easy to make, and you and your child can work on them together. But the first thing you'll need to do is go grocery shopping. Take your trick-or-treater on a trip down the aisles, and let your imaginations run free.

Hula Dancers
These girls were transformed into hula dancers in one afternoon. What's their secret? Their leis are made of vibrantly colored gift bows; their swinging skirts, fashioned from rope-style mop heads. The dancer on the left is even a ukulele player; her instrument is made out of recycled cardboard cereal boxes, a paper-towel tube, and rubber bands.

Tools and Materials
2 rope-style mop heads
1 pack gift bows
1 pair flip-flops
2 cereal boxes (1 small, 1 mini)
1 roll paper towels
1 box brass paper fasteners

Skirt How-To
1. Cut two rope-style mop heads down their center seams to create four panels; line up side by side.

2. Cut a piece of 2-inch-wide cloth ribbon the length of the panels, plus 12 inches on each side for tying.

3. Using a hot-glue gun, apply glue to the edges of the panels; fold ribbon in half over edges.

Lei, Headpiece, and Bracelets How-To
1. Cut ribbon to desired lengths for lei, headpiece, and bracelets. For lei, make about six evenly spaced crimps in ribbon, securing each with transparent tape so it will lie flat around neck.

2. Affix self-adhesive gift bows in assorted sizes and colors to each ribbon; loop ribbons and secure ends with double-sided tape.

3. Decorate flip-flops by affixing one large gift bow to the top of each strap.

Ukulele How-To
1. You'll need a small cereal box and a mini cereal box. Flatten boxes, cut along one side of each, and reassemble inside out using tape.

2. Use a foam cup to trace a circle on the center of the small box; cut out with scissors or a utility knife. Attach 3 brass fasteners about 1 1/2 inches below hole.

3. Cut 2 inches off one end of a paper-towel tube. Use the tube to trace one circle on the top of the small cereal box and another on the bottom of the mini cereal box; cut out.

4. Attach three brass fasteners to the front of the mini cereal box. To connect boxes to tube, apply hot glue to inside edges of holes, and insert one end of tube in each. For strings, attach three long rubber bands to fasteners at both ends.

Goldfish | Kids Crafts


Things are going swimmingly for this giggly goldfish. His quilted costume, which ends in a generous tail and is worn with an orange snap-bottom T-shirt and leggings, is perfect for a child who is mesmerized by ponds and fish tanks. The enclosed bottom makes it only suitable for babies who aren't yet walking.

Tools and Materials

60-inch-long piece of Craft paper
1 1/2 yards of orange wool felt
1 yard of 1/4-inch-thick polyurethane foam or one bag of wool-blanket batting
4 sets of Velcro fastener dots, 1/2 yard of pink wool felt
Scraps of black and white felt
White craft glue.

Goldfish How-To


1. To make patterns, draw a grid of 2-inch squares on craft paper; copy templates by hand onto it. Using fish pattern, cut one piece of orange felt and foam with front scoop neckline and one piece orange felt and foam with back neckline. Use orange part of pattern to cut one front and one back from orange felt for lining. For the front, layer foam, then whole felt, then half felt; stitch around top from notch A to notch B, with 1/4-inch seam allowance. Turn right side out so foam is between felt pieces. Quilt front from top to bottom, making rows of 4 1/2-inch scallops 2 1/2 inches apart. Repeat with remaining pieces for back. Place front and back together, right sides facing. Sew around tail from notch A to notch B, with a 1/4-inch seam allowance. Turn right side out. Sew Velcro fastener dots at shoulders and underarms, as shown on template.


2. Use hat pattern to cut two pieces of felt, one orange and one pink, and one piece of foam. Layer pieces: foam, pink felt, and orange felt. Sew top, bottom, and one side closed with 1/4-inch seam allowance. Turn right side out. Quilt as above. Fold in half, pink side out; sew along short edge. Turn orange side out. Cut eye from black and white felt scraps. Glue on as shown.

Spring Chicken | Kids Crafts


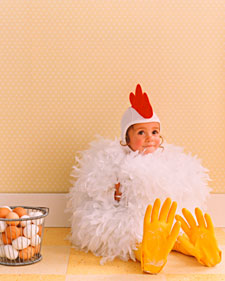
Why did this baby chicken cross the road? To get to the Halloween party, of course. Her costume is made from two tickly feather boas, ordinary kitchen gloves, yellow tights, and a pilot's cap that's crowned with a felt comb. Under the plumage, two leotards are stuffed with batting for extra plumpness. Appropriate for children ages 3 and older.

Tools and Materials

2 white long-sleeved leotards
One bag of loose wool batting
2 heavyweight white feather boas
Safety pins
Two 8-by-10-inch pieces of red wool felt
White pilot's cap
Hot-glue gun
Yellow rubber gloves
Sneakers with a heel tab

Chicken How-To

1. For the bodysuit, place one leotard inside the other; stuff batting between them, and sew together at necklines and leg holes. With your child wearing the bodysuit, drape boas across and around the body; safety-pin in place. Remove costume from child, and handstitch in place every 4 inches.


2. For the hat, use the comb template to cut two pieces of felt. Stitch combs together with a 1/4-inch seam allowance, leaving the bottom open. Turn right side out; stuff peaks with batting. Stretch hat over a ball or other round object; attach comb using the hot-glue gun on a low setting.


3. For the feet, stuff fingers of gloves with batting. Slip sneaker into glove, palm side down. Pull glove taut so fingers arch up (to prevent tripping); cut slit in center of glove from tongue of shoe to heel tab. Pull end of slit beneath heel. Snip extra cuff, leaving 2 inches; cut a notch at each corner. Fold sides in; secure with hot glue. Fold bottom up and top down; glue.

Egg Carton Buggy Mobile | Kids Crafts


What you'll need:

  • 18 place cardboard egg carton
  • Scraps of colorful patterned papers (wallpaper samples, old greeting cards) or construction paper
  • Acrylic paints: red, orange, brown, light blue, green, purple, yellow, white and pink
  • Scissors
  • 2 black skinny chenille stems
  • 9 flat-backed heavy pebbles, marbles, or other object
  • White yarn
  • 2 heavy twigs or craft dowels
  • 9 medium black pom poms
  • 18 small wiggle eyes
  • White craft glue
  • Acrylic sealer spray
  • Paintbrush
  • Hot glue gun

How to make it:

  1. Remove the lid of the cardboard egg carton and save for another project. Place bottom of egg carton upside down and paint two sections with each color noted above (i.e. 2 red, 2 orange, 2 brown, etc). Repeat for a second coat and let dry. Spray all painted cups with acrylic sealer spray. See image.
  2. Cut the egg carton sections apart. Trim around the sections so that all you have left are colored cups. See image.
  3. If using patterned paper, most likely the backside of the paper is blank. If this is the case, fold the patterned paper in half, pattern on the outside. Put a layer of glue in between and stick together. This will create a piece of patterned paper that is patterned on both sides. If using construction paper this step is not necessary.
  4. Cut leaf-shaped wings from the paper.
  5. Separate the colored egg cups so that you have two groups of nine cups, one of each color.
  6. Turn one group of colored cups over, set the other group aside.
  7. Squeeze some white glue into each of the cups that are turned upward. Place a flat-backed marble into each cup and allow time for the glue to dry. This will give each bug enough weight that they will hang nicely on your mobile and will cut down on the lines tangling together. It will also help the bugs to “look” downward so that they are seen from the ground.
  8. Cut 9 pieces of yarn about 18” long each.
  9. Onto each of the egg cup halves with the marble in them, glue a black pom pom to the closed (bottom) end. Now pair up your colored egg cups.
  10. To assemble each bug body you will need a pair of the same colored egg cups, a set of paper wings, an 18” piece of yarn and your hot glue gun. Pipe a layer of hot glue onto the outer open edge of the egg cup with the marble in it, place the wings onto the glue, the yarn in the middle of the open cup at the top, and then the other egg cup goes on last. Repeat these steps for each bug.
  11. Now that the bodies are assembled you can glue the wiggle eyes onto the black pom poms.
  12. Cut the black chenille stems into 2” pieces. Bend the ends or twist them around a thin handled paintbrush. Put a dot of hot glue on the straight end and push into the top of the pom pom. Repeat for the other antenna. See image.
  13. Cut another piece of yarn about 12” in length. Crisscross the two dowels and wrap with yarn to secure, add a dot of glue to reinforce. Be sure there is enough yarn left over to tie a loop at the top to hang your mobile from.
  14. Tie each bug onto the dowels, two on each ‘arm” and one in the middle. Stagger the lengths and tie in place. When you have them where you want them, trim the excess. See image.

Tips:

  • You can decorate your bugs even more by painting on stripes or adding dots.
  • If you use construction paper, kids can decorate the paper wings with stickers, markers, glitter, etc.
  • Try recycling old speaker wires for the antennas instead of chenille stems.

Dad's Own Toolbox | Kids Crafts

Give Dad's tools a special place with a new toolbox make by the kiddos. Start with an unfinished toolbox or wooden bin found at craft stores. Let your little ones paint the toolbox Dad's favorite colors. Add an extra-special touch with wooden tools and letters they can glue on all by themselves.