RSS
Showing posts with label fun Crafts. Show all posts

Easy Kids Crafts | Moon and Stars Mobile


Try this simple and fun to make Moon and Stars Mobile.

You will need:

  • Thick card or greyboard

  • Foam or paper shapes

  • Sewing thread

  • Paints and paint brush

  • Pencil, ruler, scissors, a pair of compasses and play clay

Here's how:

  1. Cut 2 strips of thick card approximately 25cm x 4cm.

  2. Make a thin slit at the centre of each length, about 2cm high, so that the 2 pieces will slot together at right angles to form a balanced hanging frame.

  3. Take the frame apart and make small holes (just enough for the sewing thread to go through) at approximately 4cm intervals along the bottom edge of each piece of the frame. Make another 2 holes in the top of one half of the frame, one 2cm either side of the centre.

    Ask an adult to help make the holes - the point of a pair of compasses pushed carefully through the card into a lump of play clay is ideal for this stage. Make sure your work surface is well protected first.

  4. Paint or decorate the frame as required and leave to dry. Reassemble the frame once the paint is dry.

  5. Cut out moon and star shapes from paper, card or foam and decorate if required.

  6. Make a small hole near the top of each shape and thread a length of sewing thread through the hole. Then pass the thread through one of the holes in the base of the frame and tie a knot in the thread to secure. Trim off any excess thread.

    Use different lengths of thread so that the shapes hang at different levels. Hang only one shape through each hole in the frame and have a mixture of shapes and sizes on each of the 4 arms to ensure that your mobile is balanced.

  7. Attach a loop of thread through the 2 holes in the top of the frame to enable you to hang and display your mobile.

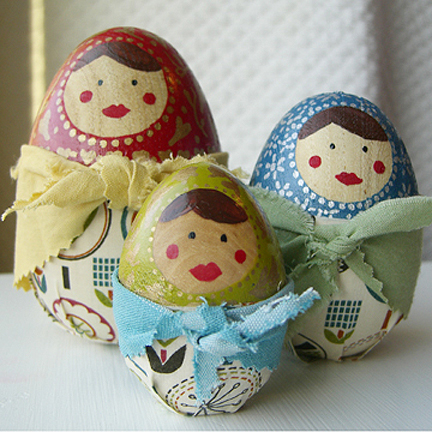
Egg Matryoshka Dolls | Kids Crafts


Supplies:

  • 3 wooden eggs of varying sizes (available at craft stores)
  • painter’s tape
  • exact-o knife
  • acrylic paint
  • small paint brushes
  • paint pen (s)
  • spray polyurethane (I used clear satin for a little shine)
  • fabric scraps
  • scissors
  • spray adhesive (multi-purpose craft adhesive)

Note: Before you begin, you might want to lightly sand the eggs. I did not sand mine and wish I had. The bumpy surface makes painting a little more difficult and the porous areas allow paint to seep under the painter’s tape when you are painting the upper portion.

Step 1: Cut a circle from the painter’s tape. I rolled out some tape onto my cutting mat, traced a circle and used an exact-o knife to cut it out. I then applied it to the egg where I wanted the face. Make sure that the tape is pressed down firmly all around the edges. Measure where you want the paint to stop and mark that with a pencil. Paint this area and allow to dry for about five minutes. Then remove the painter’s tape circle and touch up any areas where paint may have bled through.

supplies.jpg

Step 2: Paint the face. I used a small brush and undiluted acrylic paints.

Step 3: Use paint pens and/or paint to embellish the top portion. Spray with a coat of polyurethane and allow to dry.

Step 4: Wrap fabric around the eggs to measure how much you will need for each bottom portion. Mark and cut. Then cut slits about 1″ long at 1″ intervals in the bottom of the fabric. Spray back of fabric with spray adhesive and apply to the egg carefully and quickly. On the bottom press down every other tab, then come back around and press down the rest. This will allow for a pleated look at the base (see image below). You may have to spray a bit more adhesive as you are working.

doll-bottom.jpg

Step 5: Make scarves. Again wrap fabric around the egg and add a couple of inches extra. Cut a long, narrow triangle of fabric. You could finish the top, but I just folded mine under and used the selvedge ends. I used pinking shears for the edges.


Boo Balloons | Kids Crafts


Isn't it funny how ghosts rear their heads at this time of year? They seem almost charming at first, but when darkness falls, those innocent expressions are a bit more menacing.

To make a floating ghost, snap one or two green eight-hour light sticks so they glow, and insert them into a white balloon; inflate balloon, and tie closed. Use a black marker to draw the ghost's ghastly visage. Repeat to make his friends. Then hang ghosts with transparent tape, and lower the lights.