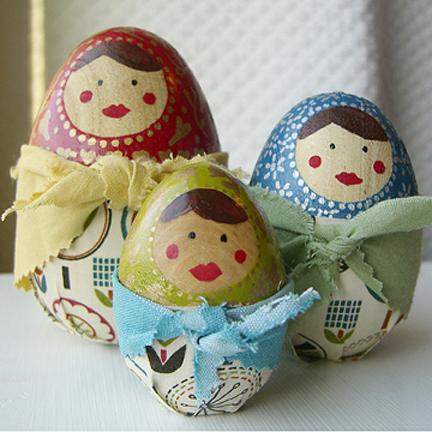
Supplies:
- 3 wooden eggs of varying sizes (available at craft stores)
- painter’s tape
- exact-o knife
- acrylic paint
- small paint brushes
- paint pen (s)
- spray polyurethane (I used clear satin for a little shine)
- fabric scraps
- scissors
- spray adhesive (multi-purpose craft adhesive)
Note: Before you begin, you might want to lightly sand the eggs. I did not sand mine and wish I had. The bumpy surface makes painting a little more difficult and the porous areas allow paint to seep under the painter’s tape when you are painting the upper portion.
Step 1: Cut a circle from the painter’s tape. I rolled out some tape onto my cutting mat, traced a circle and used an exact-o knife to cut it out. I then applied it to the egg where I wanted the face. Make sure that the tape is pressed down firmly all around the edges. Measure where you want the paint to stop and mark that with a pencil. Paint this area and allow to dry for about five minutes. Then remove the painter’s tape circle and touch up any areas where paint may have bled through.

Step 2: Paint the face. I used a small brush and undiluted acrylic paints.
Step 3: Use paint pens and/or paint to embellish the top portion. Spray with a coat of polyurethane and allow to dry.
Step 4: Wrap fabric around the eggs to measure how much you will need for each bottom portion. Mark and cut. Then cut slits about 1″ long at 1″ intervals in the bottom of the fabric. Spray back of fabric with spray adhesive and apply to the egg carefully and quickly. On the bottom press down every other tab, then come back around and press down the rest. This will allow for a pleated look at the base (see image below). You may have to spray a bit more adhesive as you are working.

Step 5: Make scarves. Again wrap fabric around the egg and add a couple of inches extra. Cut a long, narrow triangle of fabric. You could finish the top, but I just folded mine under and used the selvedge ends. I used pinking shears for the edges.
0 comments:
Post a Comment