RSS

Easy Kids Crafts | Pretty Foam Pinwheels


Catch the wind in these colorful foam pinwheels -- the perfect craft project for a breezy summer day.

Make It: Cut a circle from a colorful foam sheet and trim six slits towards the center of the circle. Fold from the outside of the circle in and secure with a touch of glue. To embellish, thread wire through a bright button and attach to the pinwheel. Gently push wire through the back of the pinwheel and wrap it around a dowel wrapped with ribbon.

Kids Crafts | Matching Memory Game Craft


Tools and Materials

  • 24 wooden tiles
  • Coarse-grit sandpaper
  • Decorative paper
  • Paper trimmer or ruler and craft knife
  • Decoupage glue
  • Paintbrush
  • Bone folder
  • Craft punch

Matching Memory Game How-To
1. Smooth any rough edges on wooden tiles with coarse-grit sandpaper.

2. Cut twenty-four 1 7/8-inch square pieces of decorative paper.

3. On one side of each wooden tile, apply a thin coat of decoupage glue with a paintbrush. Place the paper on the glue and use a bone folder to smooth out any bubbles or curls. Set aside and let dry for about 10 minutes.

4. With a craft punch, punch shapes from different colored papers. You will need to punch two shapes from each color to create the pairs needed for the game. (Note: The cupcake and ice cream cone punches used on "The Martha Stewart Show" have two parts, so colors of tops and bottoms can be mixed up as long as each pair is identical.)

5. With a paintbrush, lightly coat the other side of a tile with decoupage glue. Use the tip of a paintbrush to pick up a punched shape and place it on the tile. Lightly brush the shape down with paintbrush. Once secured in place, paint over the whole side with more of the gel. Set aside to dry. Repeat to create 12 pairs of matching tiles.

6. If desired, an additional 2 to 3 coats of decoupage glue can be applied over the whole piece for protection.

Playing the Game (1-4 Players)
Lay all pieces with paper squares facing up. Take turns turning two tiles over at a time. If the colors on the two tiles match, the player removes and keeps them. If the two tiles don't match, the player turns the tiles back over. This continues until all pieces are cleared. In a multiple-player game, the player with the most tiles wins.

Kids Crafts | Bottle Bank


This little piggy (bank) started off at the market as a bleach bottle. To make one, rinse an empty bottle with hot soapy water; let dry. Cut features such as eyes, ears, and nostrils from construction paper (ears should have tabs). Attach with double-sided tape, as shown. Tape patterned paper around body. Hot-glue empty thread spools on for legs. Cut a slot at the top for coins, and a hole in back to insert a pipe-cleaner tail.

Easy Kids Craft | Spinning Greeting Cards


Card How-To
1. Cut out a sheet of colorful paper with a width that's divisible by three; ours is 12 inches (the height is 7). Use a ruler to divide width into three equal parts; fold paper at those points. Unfold. Fold left flap over middle (these panels will be card's front), then fold both in half (use a bone folder, if you like). Draw a half circle (or half square) over outer fold as shown; cut out, cutting through all layers, just outside line.

2. Trim cutouts. Lay one on photo; trace. Cut out photo; glue onto cutout.

3. Glue string between photo and the other cutout (or another photo). Place string in fold of middle flap, positioning photo in hole; glue left flap to middle, trapping string inside. Trim string.

Easy Kids Crafts | School Pencil Box


What You Need

Shoebox (preferably kid size)
Paints, marking pens, stickers and other supplies for decorating
Glue
Pencil (for poking holes)
School Supplies (for the finishing touch)

How To Make It

Step One:
Help your preschooler paint the outside of the box, both the lid and the bottom. Let it dry.

Step Two:
Let your preschooler decorate the box however he/she would like. Use markers, stickers, glue on sequins, etc.

Step Three:
This step is for the parent. Carefully poke holes in the lid of the shoebox with the pencil. These holes will later hold pens, pencils, and crayons.

Step Four:
Fill with school supplies.

Egg Cup Ships


What you'll need:

  • 3 cardboard egg cups
  • Brown acrylic craft paint
  • Paintbrush
  • ¼ cup modeling clay or play dough
  • 6 toothpicks
  • 1 sheet white paper
  • Scissors
  • White craft glue

How to make it:

  1. Paint the egg cups inside and out with brown paint. Set aside to dry.
  2. Cut sails from white paper. You will need 6 large sails (1.5” x 1”) and 18 small sails (.5” x .75”).
  3. Set aside three of the toothpicks for the large sails. Break or cut the other three toothpicks in half, giving you 6 halves.
  4. Put a line of glue through the middle of one of the small sails. Place the cut or broken end of one of the toothpick halves onto the glue line.
  5. Roll it in the glue to cover both sides, then place another sail on top, sandwiching the two sails together. Flatten the sails together with your fingers and set aside to dry.
  6. Repeat step number 5 with each toothpick half and 2 small sails (each).
  7. Following the guide in step number 5, make the larger salls. For each large sail you will need a toothpick, 2 small sails and 2 large sails. Glue the small sail to the end of the full toothpick, and then glue the larger sail beneath it, leaving a small gap between the top and bottom sail. Set aside to dry.
  8. Roll a small amount of clay in your palm, enough to line the bottom of the egg cup. Place in the egg cup and flatten to cover bottom.
  9. Insert open end of large sail into the middle of the clay. Insert two small sails, one on either side of the large sail, into the clay.

Tips:

  • This project can also be made with open walnut shells.
  • The Nina and the Pinta were both smaller ships, but the Santa Maria was much larger. Make a larger version of the Santa Maria by using margarine tubs, craft sticks and larger pieces of paper.
  • Teachers, use this project to discuss Columbus’s voyages to the Americas.

Easy Kids Crafts | Moon and Stars Mobile


Try this simple and fun to make Moon and Stars Mobile.

You will need:

  • Thick card or greyboard

  • Foam or paper shapes

  • Sewing thread

  • Paints and paint brush

  • Pencil, ruler, scissors, a pair of compasses and play clay

Here's how:

  1. Cut 2 strips of thick card approximately 25cm x 4cm.

  2. Make a thin slit at the centre of each length, about 2cm high, so that the 2 pieces will slot together at right angles to form a balanced hanging frame.

  3. Take the frame apart and make small holes (just enough for the sewing thread to go through) at approximately 4cm intervals along the bottom edge of each piece of the frame. Make another 2 holes in the top of one half of the frame, one 2cm either side of the centre.

    Ask an adult to help make the holes - the point of a pair of compasses pushed carefully through the card into a lump of play clay is ideal for this stage. Make sure your work surface is well protected first.

  4. Paint or decorate the frame as required and leave to dry. Reassemble the frame once the paint is dry.

  5. Cut out moon and star shapes from paper, card or foam and decorate if required.

  6. Make a small hole near the top of each shape and thread a length of sewing thread through the hole. Then pass the thread through one of the holes in the base of the frame and tie a knot in the thread to secure. Trim off any excess thread.

    Use different lengths of thread so that the shapes hang at different levels. Hang only one shape through each hole in the frame and have a mixture of shapes and sizes on each of the 4 arms to ensure that your mobile is balanced.

  7. Attach a loop of thread through the 2 holes in the top of the frame to enable you to hang and display your mobile.

Cool Photo Crafts


Happy Birthday, Baby!

Celebrate with photos of your baby -- everywhere! Print a headshot onto circular labels to add character to cups, napkins, and goody bags.

Easy Kids Crafts | Paper Cup Terrarium


Help your child discover his green thumb with this easy-to-make paper cup terrarium. His eyes will be wide with wonder as he watches his plant grow bigger every day.

Make it: Use markers to decorate a paper cup. Fill the cup with soil and place a small green plant inside. Give the plant a companion by adding a toy insect, a butterfly, or even a dinosaur on top of the soil. Cover the plant with a clear plastic cup and tape the two cups together. Place your new terrarium near a sunny window, add a little TLC, and track its growth together.

Paper Plate Banjo


Indulge your kids' musical fantasies with this simple banjo made from paper plates and a few well-tuned rubber bands. Making music was never this much fun!

Make it: Stack two thick-weight paper plates and staple them together for durability. Let your kids paint the stacked plates their favorite colors and decorate them with stickers. Attach a paint stick to the back of the stacked plates and glue beads to the end as the pegs. Finally, add strings by stretching rubber bands around the stacked plates.

Crafts Kids | Recycled Blooms


What You'll Need
  • Empty toilet-paper tubes
  • Ruler
  • Pencil
  • Kid-friendly scissors
  • Bamboo skewers
  • Paint
  • Paintbrush
  • Tissue paper
  • Green cardstock
Instructions
  1. Draw a ring 2 inches from edge of tube. Repeat on other end. Then, from each 2-inch ring, draw cut lines every 1/2 inch. Snip along each line to make petals.
  2. Fold petals back to create flower. Paint flower and bamboo skewers; let dry. Cut out green leaves and glue to skewers.
  3. Push the skewer through one end of the flower's center until it just touches the other end. Crumple an 8-inch square of tissue paper and place in the center.

7 Grocery Getups | Crafts Kids


Going to the supermarket takes on a whole new meaning when the goal is to look for ingredients for costumes. Who knew you could use ordinary household supplies to create Halloween haute couture? Add some craft supplies, and construct the costumes in most cases with just staples, packing tape, and glue. They're easy to make, and you and your child can work on them together. But the first thing you'll need to do is go grocery shopping. Take your trick-or-treater on a trip down the aisles, and let your imaginations run free.

Hula Dancers
These girls were transformed into hula dancers in one afternoon. What's their secret? Their leis are made of vibrantly colored gift bows; their swinging skirts, fashioned from rope-style mop heads. The dancer on the left is even a ukulele player; her instrument is made out of recycled cardboard cereal boxes, a paper-towel tube, and rubber bands.

Tools and Materials
2 rope-style mop heads
1 pack gift bows
1 pair flip-flops
2 cereal boxes (1 small, 1 mini)
1 roll paper towels
1 box brass paper fasteners

Skirt How-To
1. Cut two rope-style mop heads down their center seams to create four panels; line up side by side.

2. Cut a piece of 2-inch-wide cloth ribbon the length of the panels, plus 12 inches on each side for tying.

3. Using a hot-glue gun, apply glue to the edges of the panels; fold ribbon in half over edges.

Lei, Headpiece, and Bracelets How-To
1. Cut ribbon to desired lengths for lei, headpiece, and bracelets. For lei, make about six evenly spaced crimps in ribbon, securing each with transparent tape so it will lie flat around neck.

2. Affix self-adhesive gift bows in assorted sizes and colors to each ribbon; loop ribbons and secure ends with double-sided tape.

3. Decorate flip-flops by affixing one large gift bow to the top of each strap.

Ukulele How-To
1. You'll need a small cereal box and a mini cereal box. Flatten boxes, cut along one side of each, and reassemble inside out using tape.

2. Use a foam cup to trace a circle on the center of the small box; cut out with scissors or a utility knife. Attach 3 brass fasteners about 1 1/2 inches below hole.

3. Cut 2 inches off one end of a paper-towel tube. Use the tube to trace one circle on the top of the small cereal box and another on the bottom of the mini cereal box; cut out.

4. Attach three brass fasteners to the front of the mini cereal box. To connect boxes to tube, apply hot glue to inside edges of holes, and insert one end of tube in each. For strings, attach three long rubber bands to fasteners at both ends.

Bunny Ears


Turn your little one into an Easter bunny with a pair of pink felt ears.

Tools and Materials
Child-size headband
8-by-16-inch piece of pink felt
6-by-6-inch piece of white felt scissors
pinking or scalloped shears (optional)
hot-glue gun
hot-glue sticks

To Cover the Headband
1. Measure the width and length of the top of the headband, add 1/2 inch to all sides, and cut a strip of pink felt to cover.

2. Glue the felt strip onto the top of the headband, wrapping the extra material around the headband's edges.

3. Measure the underside of the headband, and cut a strip of pink felt to fit.

4. Glue the strip to the underside, creating a backing that covers the edges of the top felt.

To Make the Ears
1. Print out our bunny-ears template, and cut out both shapes.

2. Trace the outer-ear shape onto pink felt twice, and cut along scalloped edge (or cut out with pinking or scalloped shears).

3. Trace the inner-ear shape onto white felt twice, and cut out with regular scissors.

4. Glue each pair of ears together with hot glue, and let dry.

5. Crease each ear vertically down the middle, and press.

6. Fold up the bottom flaps on either side of the notch, and attach to headband with hot glue, pulling notches closed so ears are slightly bent. Hold until glue sets.

Printable Valentines


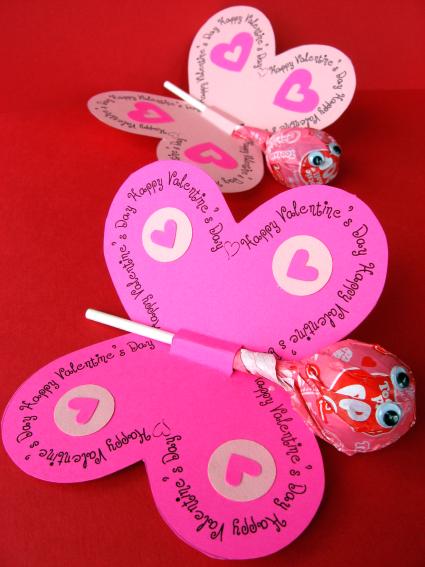
Here is a free printable Valentine if you need something quick and easy. I am going to have my little girl make these for her class———-I am sure the next ones will have a generous helping of glitter for embellishment!

Download Butterfly Valentine ,print on colored card-stock, cut out, make slits for sucker, add some decorations (cut out shapes of paper, stickers, glitter, etc.), insert sucker and then add some wiggly eyes to the top of the sucker. Add a piece of tape to the back to keep the sucker securely in place.

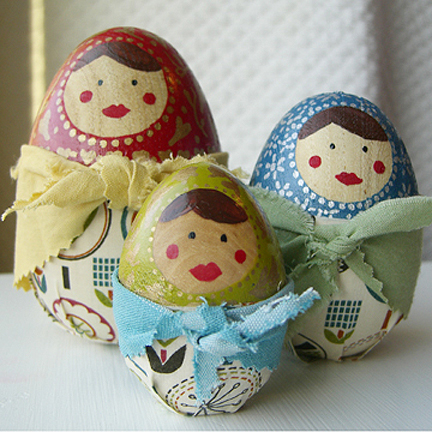
Egg Matryoshka Dolls | Kids Crafts


Supplies:

  • 3 wooden eggs of varying sizes (available at craft stores)
  • painter’s tape
  • exact-o knife
  • acrylic paint
  • small paint brushes
  • paint pen (s)
  • spray polyurethane (I used clear satin for a little shine)
  • fabric scraps
  • scissors
  • spray adhesive (multi-purpose craft adhesive)

Note: Before you begin, you might want to lightly sand the eggs. I did not sand mine and wish I had. The bumpy surface makes painting a little more difficult and the porous areas allow paint to seep under the painter’s tape when you are painting the upper portion.

Step 1: Cut a circle from the painter’s tape. I rolled out some tape onto my cutting mat, traced a circle and used an exact-o knife to cut it out. I then applied it to the egg where I wanted the face. Make sure that the tape is pressed down firmly all around the edges. Measure where you want the paint to stop and mark that with a pencil. Paint this area and allow to dry for about five minutes. Then remove the painter’s tape circle and touch up any areas where paint may have bled through.

supplies.jpg

Step 2: Paint the face. I used a small brush and undiluted acrylic paints.

Step 3: Use paint pens and/or paint to embellish the top portion. Spray with a coat of polyurethane and allow to dry.

Step 4: Wrap fabric around the eggs to measure how much you will need for each bottom portion. Mark and cut. Then cut slits about 1″ long at 1″ intervals in the bottom of the fabric. Spray back of fabric with spray adhesive and apply to the egg carefully and quickly. On the bottom press down every other tab, then come back around and press down the rest. This will allow for a pleated look at the base (see image below). You may have to spray a bit more adhesive as you are working.

doll-bottom.jpg

Step 5: Make scarves. Again wrap fabric around the egg and add a couple of inches extra. Cut a long, narrow triangle of fabric. You could finish the top, but I just folded mine under and used the selvedge ends. I used pinking shears for the edges.


Goldfish | Kids Crafts


Things are going swimmingly for this giggly goldfish. His quilted costume, which ends in a generous tail and is worn with an orange snap-bottom T-shirt and leggings, is perfect for a child who is mesmerized by ponds and fish tanks. The enclosed bottom makes it only suitable for babies who aren't yet walking.

Tools and Materials

60-inch-long piece of Craft paper
1 1/2 yards of orange wool felt
1 yard of 1/4-inch-thick polyurethane foam or one bag of wool-blanket batting
4 sets of Velcro fastener dots, 1/2 yard of pink wool felt
Scraps of black and white felt
White craft glue.

Goldfish How-To


1. To make patterns, draw a grid of 2-inch squares on craft paper; copy templates by hand onto it. Using fish pattern, cut one piece of orange felt and foam with front scoop neckline and one piece orange felt and foam with back neckline. Use orange part of pattern to cut one front and one back from orange felt for lining. For the front, layer foam, then whole felt, then half felt; stitch around top from notch A to notch B, with 1/4-inch seam allowance. Turn right side out so foam is between felt pieces. Quilt front from top to bottom, making rows of 4 1/2-inch scallops 2 1/2 inches apart. Repeat with remaining pieces for back. Place front and back together, right sides facing. Sew around tail from notch A to notch B, with a 1/4-inch seam allowance. Turn right side out. Sew Velcro fastener dots at shoulders and underarms, as shown on template.


2. Use hat pattern to cut two pieces of felt, one orange and one pink, and one piece of foam. Layer pieces: foam, pink felt, and orange felt. Sew top, bottom, and one side closed with 1/4-inch seam allowance. Turn right side out. Quilt as above. Fold in half, pink side out; sew along short edge. Turn orange side out. Cut eye from black and white felt scraps. Glue on as shown.

Spring Chicken | Kids Crafts


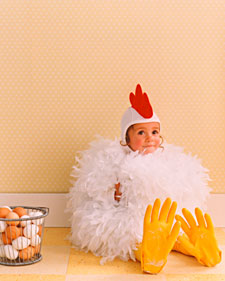
Why did this baby chicken cross the road? To get to the Halloween party, of course. Her costume is made from two tickly feather boas, ordinary kitchen gloves, yellow tights, and a pilot's cap that's crowned with a felt comb. Under the plumage, two leotards are stuffed with batting for extra plumpness. Appropriate for children ages 3 and older.

Tools and Materials

2 white long-sleeved leotards
One bag of loose wool batting
2 heavyweight white feather boas
Safety pins
Two 8-by-10-inch pieces of red wool felt
White pilot's cap
Hot-glue gun
Yellow rubber gloves
Sneakers with a heel tab

Chicken How-To

1. For the bodysuit, place one leotard inside the other; stuff batting between them, and sew together at necklines and leg holes. With your child wearing the bodysuit, drape boas across and around the body; safety-pin in place. Remove costume from child, and handstitch in place every 4 inches.


2. For the hat, use the comb template to cut two pieces of felt. Stitch combs together with a 1/4-inch seam allowance, leaving the bottom open. Turn right side out; stuff peaks with batting. Stretch hat over a ball or other round object; attach comb using the hot-glue gun on a low setting.


3. For the feet, stuff fingers of gloves with batting. Slip sneaker into glove, palm side down. Pull glove taut so fingers arch up (to prevent tripping); cut slit in center of glove from tongue of shoe to heel tab. Pull end of slit beneath heel. Snip extra cuff, leaving 2 inches; cut a notch at each corner. Fold sides in; secure with hot glue. Fold bottom up and top down; glue.

Boo Balloons | Kids Crafts


Isn't it funny how ghosts rear their heads at this time of year? They seem almost charming at first, but when darkness falls, those innocent expressions are a bit more menacing.

To make a floating ghost, snap one or two green eight-hour light sticks so they glow, and insert them into a white balloon; inflate balloon, and tie closed. Use a black marker to draw the ghost's ghastly visage. Repeat to make his friends. Then hang ghosts with transparent tape, and lower the lights.

Pocket Scarf | Kids Crafts


A muffler with sewn-up compartments offers all kinds of possibilities. Objects can be stockpiled, cleverly hidden, or simply toted along, like the dog on the left, for a very warm ride.

This is an easy project that older kids can do with adult supervision; all that's needed is pins, yarn, and a needle. Work with a scarf that's long and wide enough to accommodate the size pockets that kids would like.

Pocket-Scarf How-To
Kids should decide whether they want two pockets or three, and if they want them to be equal widths or not. Fold one end of the scarf up to the desired depth.

Pin the sides, and then pin the middle to correspond to the desired widths; you can use a ruler to make sure the pins are in a straight row, or follow the rib of the scarf itself.

Make a running stitch with a darning needle and yarn through both layers, using the pins as a guide. Reinforce top of seam with a cross stitch or a double stitch and tie off, hiding the ends inside.

Fun Stick Puppets | Kids Craft


Supplies and Tools
* Bucket of sticky-back craft foam shapes
* Colored craft sticks
* Tacky glue
* Scissors

Directions
1. Carefully cut away paper on back of foam shapes only where craft stick will be placed. Note: Adult supervision may be needed to cut paper from back of sticker.

2. Glue craft stick to foam shape.

3. If desired, two sticks can be glued together for a longer puppet handle.

Skill Level: No experience necessary

Approximate Crafting Time: 30 minutes